AppVeyor with a hint of Chocolatey
Posted on November 06, 2014
![]()
Chocolatey is a wonderful tool that allows you installing your favourite programs with a single command. Unlike regular process of installing software with interactive setup package where you keep clicking “Next”, “Accept”, “Finish”, etc. Chocolatey does the job without questions asked. By analogy from Linux world Chocolatey is a package manager for Windows.
Chocolatey is great when you setup your development environment and it’s especially great for installing custom software during the build process on AppVeyor! As you know AppVeyor offers fully-customizable build environment where you have admin rights on build machines. For example, if you need to install MongoDB for your integration tests you can do that with the following command (the latest version of Chocolatey is already installed on AppVeyor build workers):
choco install mongodb
The list of software that can be installing with Chocolatey is huge and it’s growing fast. The catalog is community-driven and you can contribute your own packages or update existing ones. Behind the scene Chocolatey uses feed of NuGet packages. Each package contains install.ps1 and uninstall.ps1 PowerShell scripts. If it’s so-called “portable” package application files are stored along with scripts or if it’s “native” package application MSI is downloaded from the Internet and silently installed.
So, Chocolatey is well-established thing, but Chocolatey team want moving it to the next level and making Chocolatey an alternative Windows Store! They created a KickStarter campaign and are asking for our support! Let’s help Chocolatey to do an open, community-driven Application Store for Windows.
Let’s get Chocolatey!
appveyor.yml and multiple branches
Posted on July 23, 2014
The problem
If you use git flow you may want to have a different build configuration (e.g. deploying to a different environment) in a feature branch. Changing appveyor.yml in a feature branch becomes an issue when you merge it into master overriding appveyor.yml and breaking master builds.
The solution
To solve this problem AppVeyor allows having multiple per-branch configurations in a single appveyor.yml.
Multiple configurations are defined as a list with branches section in every item that:
# configuration for "master" branch
# build in Release mode and deploy to Azure
-
  branches:
    only:
      - master

  configuration: Release
  deploy:
    provider: AzureCS
    ...

# configuration for all branches starting from "dev-"
# build in Debug mode and deploy locally for testing
-
  branches:
    only:
      - /dev-.*/

  configuration: Debug
  deploy:
    provider: Local
    ...

# "fall back" configuration for all other branches
# no "branches" section defined
# do not deploy at all
-
  configuration: Debug
Unlike white- and blacklisting branches section here works like a selector, not a filter. Configuration selection algorithm is the following:
- Check configurations with
branches/onlysection defined. If branch is found in configuration’sonlysection use this configuration. - Check configurations with
branches/exceptsection defined. If branch is NOT found in configuration’sexceptsection use this configuration. - Check configurations without
branchessection. If such configuration is found use it. - If all previous steps fail, the build is not run.
Enjoy!
Shallow clone for Git repositories
Posted on June 04, 2014
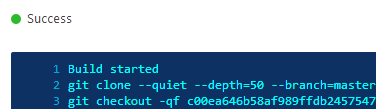
AppVeyor runs every build on a new VM which is getting decommissioned right after the build finishes. The state between consequent builds of the same project is not preserved and every time a new build starts AppVeyor clones entire repository and then checkouts a specific commit. This becomes a challenge for very large repositories or repositories with long history as it takes a significant time to do a clone.
We introduced a new feature called “shallow clone” aiming to improve the situation with large repositories. It offers two options:
- Setting depth of
git clonecommand - Downloading repository as zipball using GitHub API
Setting depth of git clone command
By default AppVeyor clones entire repository with all the history. You can limit the number of last commits you’d like to clone. This feature works for Git repositories hosted at GitHub, BitBucket and Kiln. You can set clone depth on General tab of project settings:
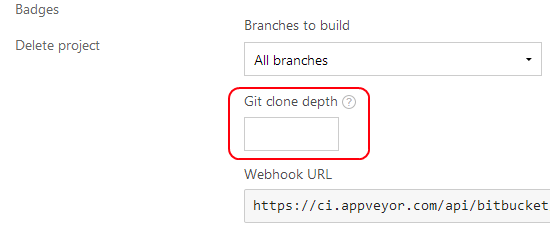
To set clone depth in appveyor.yml add the following in the root of config:
clone_depth: <number>
Note: Be aware that if you do a lot of commits producing queued builds and depth number is too small, git checkout operation following git clone can fail because the requested commit is not present in a cloned repository.
Downloading repository using GitHub API
As title says this option is specific to GitHub. It uses GitHub API to download specific commit of the repository as zip archive and then unpacks it on build worker machine. This feature works for regular commits, branch commits and pull requests.
You can enable this option through UI on General tab of project settings:
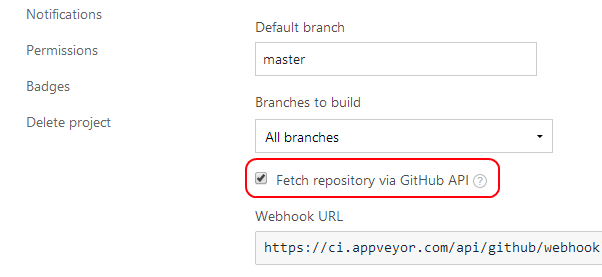
To enable it through appveyor.yml add the following in the root of config:
shallow_clone: true
Enjoy!
Build worker improvements
Posted on April 23, 2014
While we are working on some new exciting stuff we continue improving things to make your AppVeyor experience even more smooth and streamlined. One of those recent improvements is a new build worker provisioning engine. Every build in AppVeyor runs on a dedicated virtual machine hosted in Microsoft Azure (yes, now it’s called “Microsoft Azure”). Azure is a great platform - their VMs are considerably faster than competitors’ and creation of a new VM is a blast (usually around 3 minutes). Simplified build flow is the following:
- Build starts
- A new VM is provisioning from “master” image (VHD) or being taken from “pre-heated” cache.
- Build Agent installed on VM runs the build and “talks” to AppVeyor via Web Sockets (SignalR).
- VM is being deleted after the build
How it was before
We were creating a new VM and then passing build details and starting Build Agent service through PowerShell remoting. That approach had a number of disadvantages:
- Open WinRM endpoint accessible from the same network.
- Constantly “pinging” starting up VM until it’s ready to accept WinRM connection. That solution had very high fault rate.
- Once assigned to a build it was hard to switch build to another VM if the first one is unhealthy.
New approach
The new provisioning mechanism works “inside out”, i.e. Build Agent is started on VM boot and is “listening” for incoming command from AppVeyor using Web Sockets.
This new approach gives a number of benefits:
- Build worker VM is completely isolated. It doesn’t have an external IP and no endpoints are configured - all inbound connections are prohibited. Even if you know its internal IP address (which is not a secret if you read NIC properties) you still can’t knock it as it sits in a separate private network (Azure cloud service).
- No more starring at “Provisioning build worker…” or “pending” builds. Now it’s just “Queued” and then “Running”. We got some feedback that knowing VM is in provisioning state doesn’t feel very good and make customers nervous :)
- If there is pre-heated VM available (we maintain between 3-4 VMs) your build starts almost instantly!
- If there are no pre-heated VMs it would take around 3 minutes to provision new VM from scratch.
- Whenever AppVeyor detects there is unhealthy VM worker it will re-schedule the build to another healthy instance, so generally it means being a bit longer in “Queued” state.
We also optimized worker “master” image (VHD) itself to make sure only minimum set of services is enabled to boot fast, eliminate lags and free more memory for your builds. Of course, you can still configure required services such as IIS and SQL Server databases.
Oh, and we introduced Windows Server 2012 R2 image which has almost identical configuration to Windows Server 2012 (except it doesn’t have VS 2010 installed).
Enjoy!
Build worker improvements
Posted on March 31, 2014
When deploying web application to different environments you don’t want to re-build application package every time with different configurations, but you want to deploy the same package (artifact) with some environment-specific settings configured during deployment. When using Web Deploy the problem can be easily solved by Web Deploy parametrization.
Usage scenarios
Most common use cases for Web Deploy parametrization is updating node/attribute value in XML files or replacing a token in text files, for example:
- appSettings in
web.config - connection strings in
web.config - WCF endpoints
- Paths to log files
- Database name in SQL install script
Parameters.xml
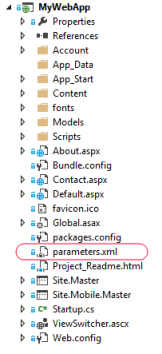
To enable Web Deploy parametrization add parameters.xml file in the root of your web application.
Parameters.xml contains the list of parameters required (or supported) by your Web Deploy package. In the example below we introduce two parameters - one to update path to log file in appSettings section of web.config and another one to set database name in SQL script.
Parameter element describes the name, default value and the places where and how this parameter must be applied.
Parameters.xml for our example:
<?xml version="1.0" encoding="utf-8" ?>
<parameters>
  <parameter name="LogsPath" defaultValue="logs">
    <parameterEntry kind="XmlFile" scope="\\web.config$" match="/configuration/appSettings/add[@key='LogsPath']/@value" />
  </parameter>
  <parameter name="DatabaseName">
    <parameterEntry kind="TextFile" scope="\\Database\\install_db.sql$" match="@@database_name@@" />
  </parameter>
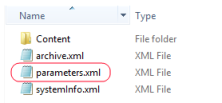
When Web Deploy package is built you can open it in the explorer and see parameters.xml in the root:
Resulting parameters.xml combines your custom parameters and system ones such as IIS Web Application Name. You don’t have to set IIS Web Application Name parameter explicitly - AppVeyor does that for you.
Read more about defining parameters: https://technet.microsoft.com/en-us/library/dd569084(v=ws.10).aspx
Setting parameters during deployment
Web Deploy provider in AppVeyor analyzes Web Deploy package and looks into environment variables to set parameter values with matching names.
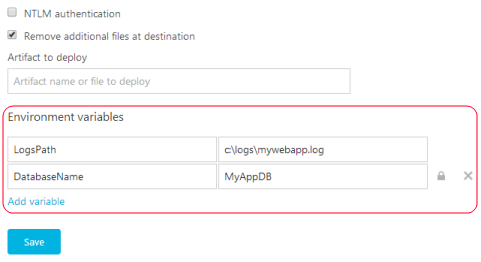
When promoting specific build from Environment page you set variables on environment settings page:
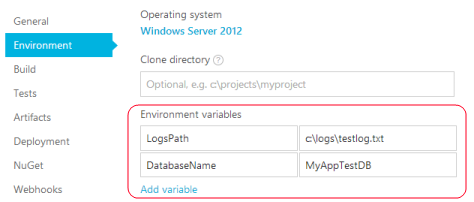
When deploying during the build session environment variables are used instead. You can set build environment variables on Environment tab of project settings, appveyor.yml or programmatically during the build.
Variables defined during the build override those ones defined on Environment level.
Web Deploy parametrization is supported by Deployment Agent too when deploying from Web Deploy package.
Related articles: