AppVeyor for Linux is generally available
Posted on May 15, 2018
Dear friends!
Just a short two months ago we announced the private beta of AppVeyor for Linux and we’ve been amazed by the amount of positive feedback we received and how high the demand was.
Thank you for your active participation! We managed to find and fix some issues, add missing pieces and make it ready for GA.
Starting today Ubuntu image will be available to all accounts, free and paid alike. The current working image users will see is based on Ubuntu 16.04 (Xenial Xerus) and a new one based on Ubuntu 18.04 (Bionic Beaver) will be added soon. We are committed to providing you the best and the latest Linux experience on our platform.
There is the Getting started with AppVeyor for Linux guide where you can also find a list of supported features and software pre-installed on the image.
Now AppVeyor is officially a multi platform CI service!
Enjoy your build!
Best regards,
AppVeyor team
Follow us on Twitter: @appveyor
Advanced build matrix configuration in AppVeyor
Posted on April 25, 2018
AppVeyor config evolution
AppVeyor configuration has grown incrementally more sophisiticated in order to accommodate not only a wide range of build requirements, but also AppVeyor’s feature set, and most pertinently to this post, the addition of linux build machines. This welcome addition to the AppVeyor platform means that users may want to build a cross-platform repository but may not want to manage separate configuration files. This is no longer a problem if we make use of the for: node in our appveyor configuration. This key was added previously to allow users to share common configuration between all branches while overriding parts of that configuration in specific branches. But along with the added features comes increased possibility of confusion regarding expected results of configuration.
The aim of this post is to give some more detail about advanced configuration options in which the potential for confusion is highest.
First, lets consider the following example:
# Configuration shared by all build jobs
platform:
  - x86
  - x64
configuration:
  - Debug
  - Release
environment:
  my_var1: value1
  my_var2: value2
test_script:
  - ps: Write-Host "common test script"
for:
  -
    branches:
      only:
        - master
    configuration: Release
    environment:
      my_var1: not-value1
      my_var3: new-value

  -
    branches:
      only:
        - /dev-.*/ #regular expressions can also be used to match several branches
      platform: Any CPU
      test_script:
        - echo "overriding common test script"
In the above configuration we see familiar keys being set that will be shared by all jobs calculated by the matrix. In the for: section we specify some overrides to those keys, and also some additions. If you’re not already familiar with the rules for configuration merging they can be found in the docs.
One potential source of confusion is understanding the number of jobs that will be calculated given the build matrix. In the example above, commits to unspecified branches (i.e. not ‘master’ branches and not any branch matching the /dev-.*/ regexp) result in a build matrix calculated to have 4 jobs (2-configuration * 2-platform) Meanwhile, commits to master branch result in 2 jobs since the configuration key is overridden and set to a scalar value instead of a list (1-configuration * 2-platform). Ditto for commits to any branch matching the /dev-*/ regexp, except its the platform being overridden this time (2-configuration * 1-platform).
But the for: node functionality also allows the user to manipulate the build job matrix in order to specify platform specific configuration. Which is precisely where it serves cross-platform repos best.
For example:
version: 1.0.{build}

image:
  - Visual Studio 2017
  - Ubuntu
configuration:
  - Debug
  - Release
environment:
  my_var1: value1
  my_var2: value2
  matrix:
    - my_var3: value3
    - my_var4: value4
test_script:
  - ps: Write-Host "common test script"
matrix:
  - fast_finish: true
for:
  -
    matrix:
      only:
        - configuration: Release
          my_var3: value3
    environment:
      my_var1: overriden-value1
    platform: Any CPU # this setting is ignored
    test_script:
      - ps: write-host "for-matrix override test script 1"

  -
    matrix:
      only:
        - image: Ubuntu
          my_var4: value4
      pull_requests:
        do_not_increment_build_number: true # this setting is ignored
      allow_failures:
        - platform: x64 # this setting is ignored
    environment:
      my_var2: overridden-value2
    test_script:
      - sh: echo for-matrix override build script
Here we are able to create the desired matrix which consists of 8 jobs (2-image / 2-configuration / 2-environment variable groups), then in the for: node, specify special conditions for each job. Another important thing to note is the three matrix configuration keys within the for: node that are ignored. This makes sense intuitively, since these are meant to be, in a sense, ‘global’ configuration of the job matrix behaviour. A list of settings that are ignored can be found here
To keep your configuration code as slim as possible, its a good idea to utilize a ‘fall through’ as a default config. Consider this simple example:
version: 1.0.{build}

configuration:
  - Debug
  - Test

for:
  -
    matrix:
      only:
        - configuration: Debug
    build_script:
      - ps: "Debug build script"

  -
    matrix:
      only:
        - configuration: Test
    build_script:
      - echo "Test build script"
This configuration can be simplified to the following, allowing the ‘Debug’ configuration to be the default:
version: 1.0.{build}

configuration:
  - Debug
  - Test
build_script:
  - ps: "Debug build script"
for:
  -
    matrix:
      only:
        - configuration: Test
    build_script:
      - echo "Test build script"
AppVeyor’s new configuration capabilities give the user fine grained control allowing for virtually any imaginable configuration. But use these capabilities wisely and take a step back to make sure your build matrix is well formed and sensible.
Octopus Deploy comes to AppVeyor
Posted on April 05, 2018
This is a guest post by Robert Erez (Twitter: @no_erez), Program Manager at Octopus Deploy.

The fantastic team at AppVeyor have recently added built-in support for pushing and deploying your projects (.NET, Java, JavaScript etc) with Octopus Deploy. What is Octopus Deploy I hear you ask? Octopus Deploy is a friendly deployment automation tool that makes it easy to automate your application deployments in a fast, repeatable and reliable manner. Octopus takes over where your build server ends, enabling you to easily automate even the most complicated application deployments, whether on-prem or in the cloud. Deploying your application through environments like DEV, TEST and PRODUCTION requires the assurance that the each releases are identical where it counts, but with configuration that can be injected to change from environment to environment.
Let's take a look at how this new partnership between AppVeyor and Octopus Deploy can help you build a complete devliery pipeline in the cloud.
The public OctopusSamples/RandomQuotes-aspmvc4 repository provides a basic ASP.NET MVC app to display a bunch of wise quotes. Our goal is to set up a delivery pipeline to deploy this website to our IIS server for both a staging and then production environment.
AppVeyor Octopus Plugin
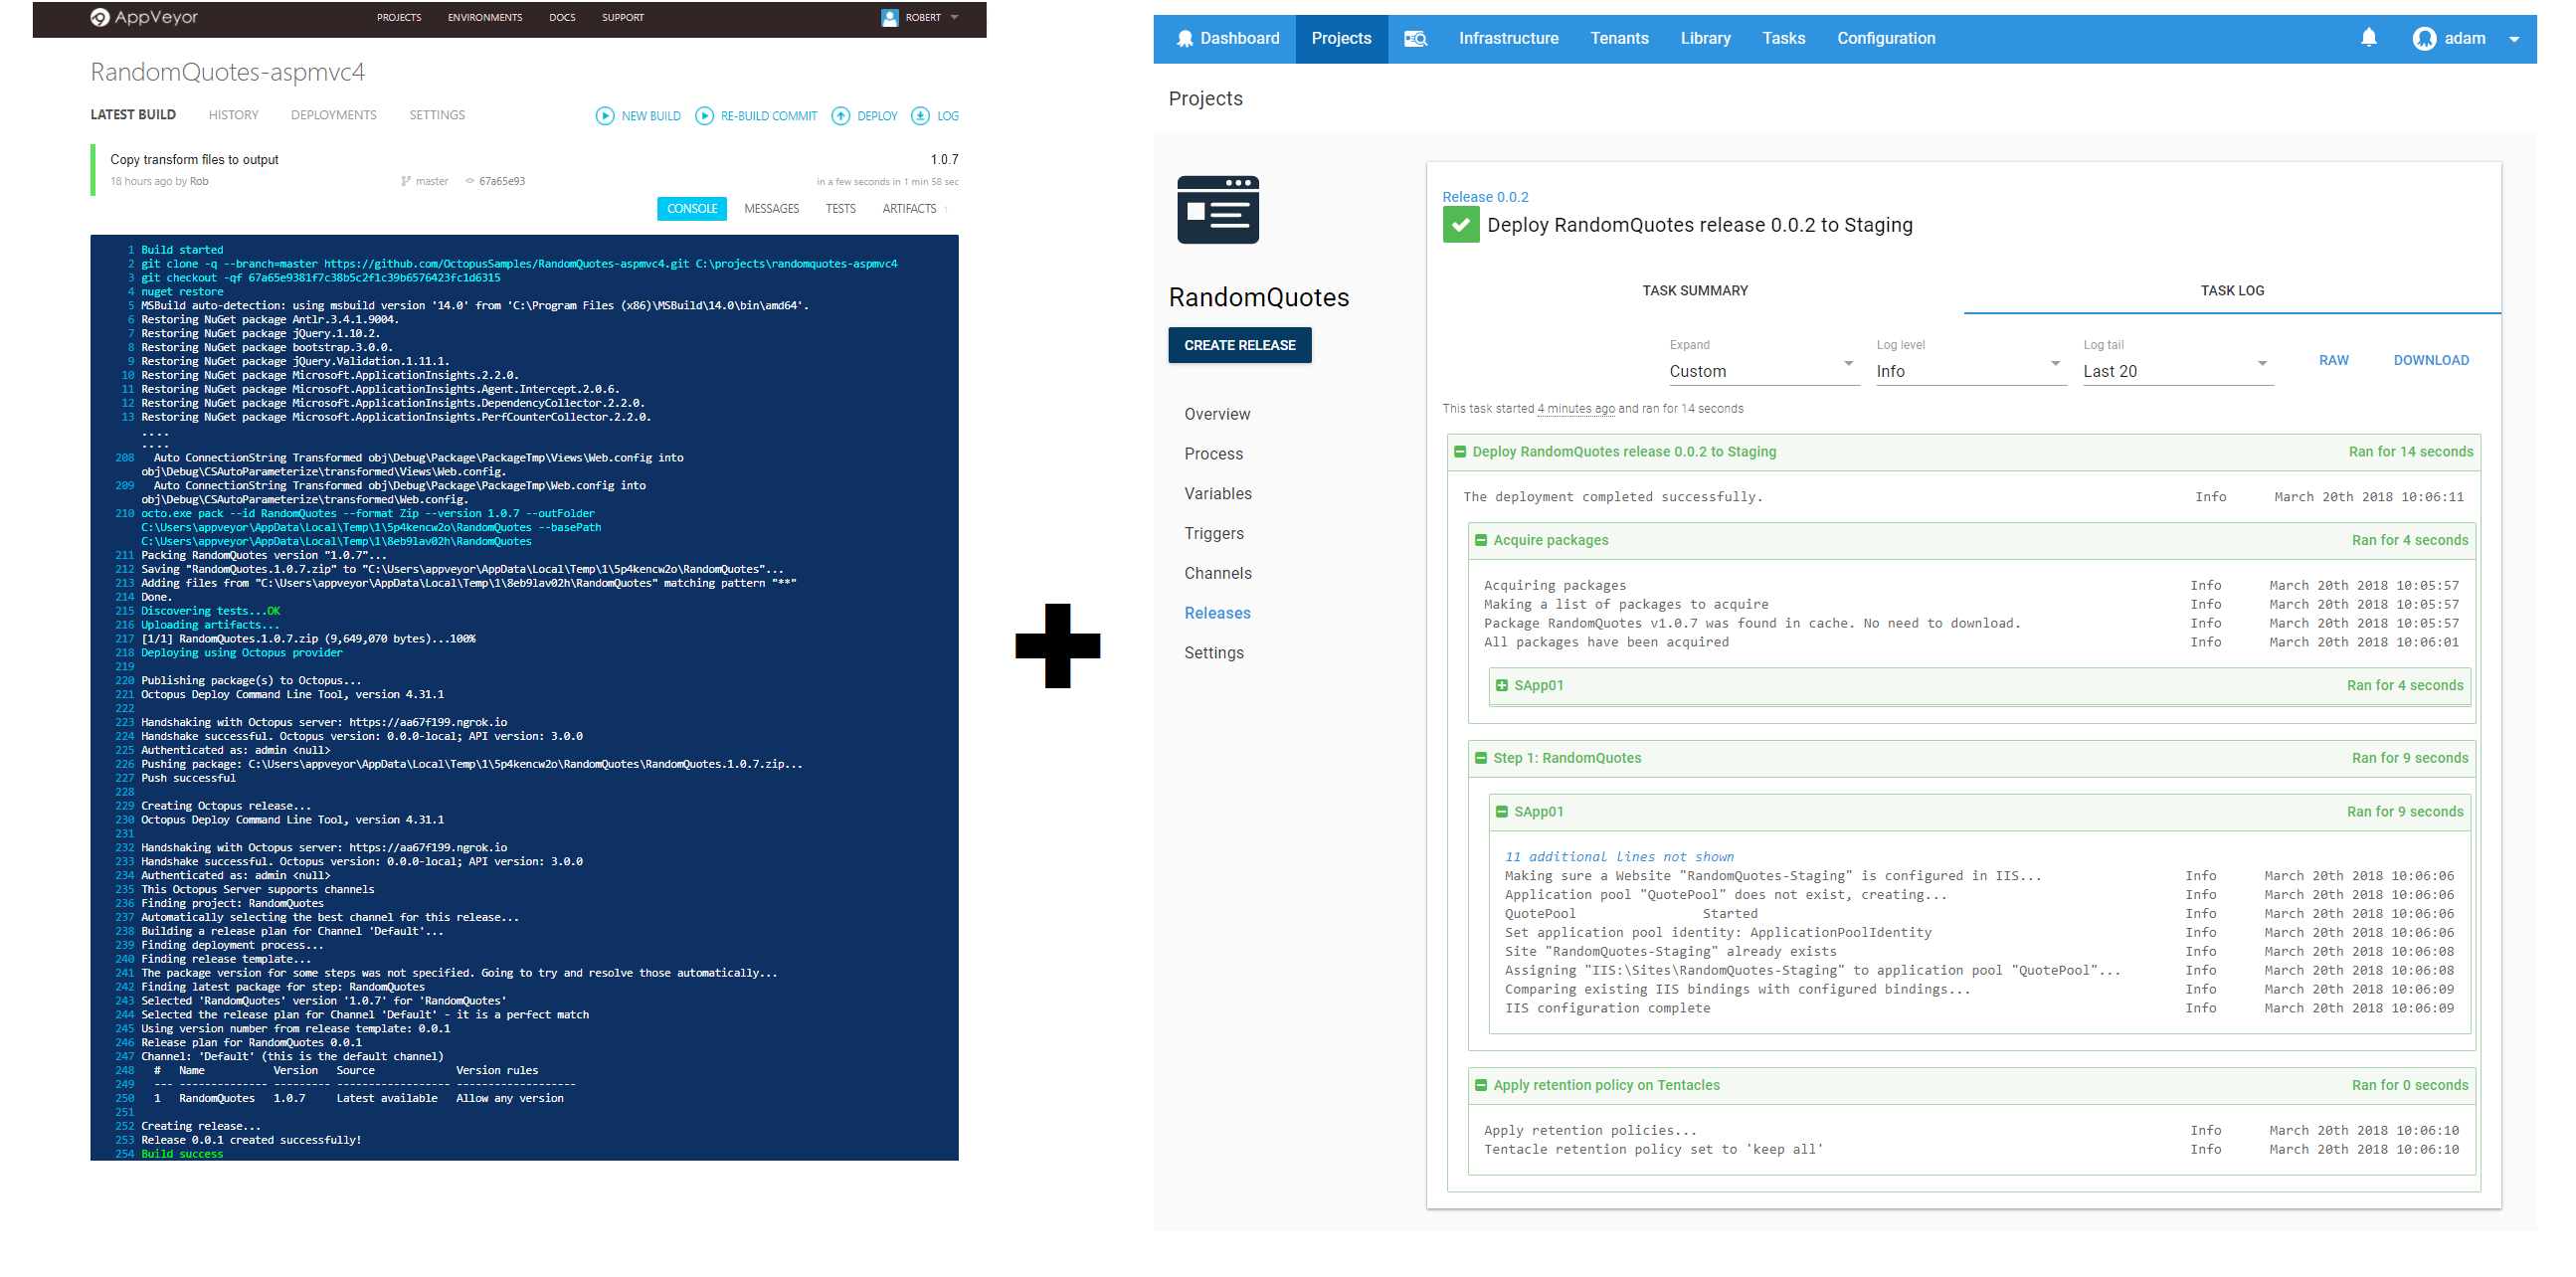
Starting with the build of our project, I've added the OctopusSamples/RandomQuotes-aspmvc4 GitHub repository as the source of a new AppVeyor project.
Build & Pack
Looking at the build phase, you should notice the new Package Applications for Octopus Deployment:
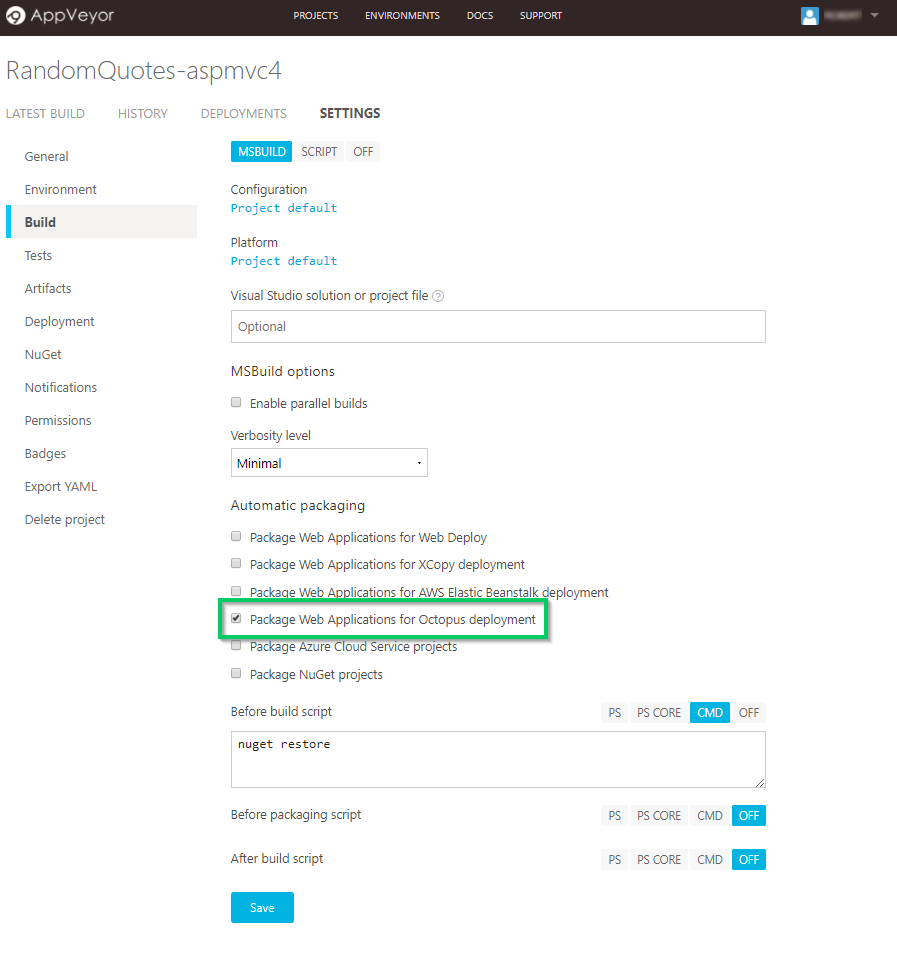
This flag ensures that once the build has completed, the contents are zipped up into a package that can be pushed to Octopus Deploy. Although Octopus will accept any NuGet, zip, or tar package this flag will use the octo.exe tool to create a zip, named using the application name and version.
Advanced features in Octopus-like Channels allow you to configure custom rules to prevent pre-release versioned packages from getting pushed to production, or ensure that version requirements are met for any linked packages as part of that deployment.
Push
In the Deployment configuration of the AppVeyor project, select the new Octopus Deploy deployment provider. This feature performs all the appropriate calls to pass the package into Octopus and create a related Octopus Release.
In Octopus, a Release ensures that each versioned build artifact will progress through its various environment phases with the same snapshotted deployment process, even if that project process is modified while the release is progressing. Reliable, repeatable deployments are our mantra.

After adding your Octopus Server URL and API Key, tick the Push Packages option to allow AppVeyor to auto-detect the Octopus package built in the previous step. AppVeyor will then push the package to the Octopus built-in NuGet feed. Although Octopus supports automatic release creation when a new package is available, in this scenario we will trigger it through AppVeyor. Click the Create Release checkbox and provide the name of the project, RandomQuotes which we will later set-up in Octopus and which AppVeyor will programmatically trigger. Octopus was built API first and as such every feature and behavior can be configured and triggered via HTTP endpoints to integrate into any existing CI/CD pipeline!).
With our AppVeyor build pipeline set up, let's now jump into our Octopus Server and get this website deployed.
Continuing Deployment Through Octopus
With a dead simple Octopus Server installation (which, can naturally itself be automated) we are ready to add our new RandomQuotes project through the Octopus Web Portal. Hosted Octopus is an exciting new option which will be available soon that allows you to use Octopus Deploy without any on-premise infrastructure. We will manage your servers for you!
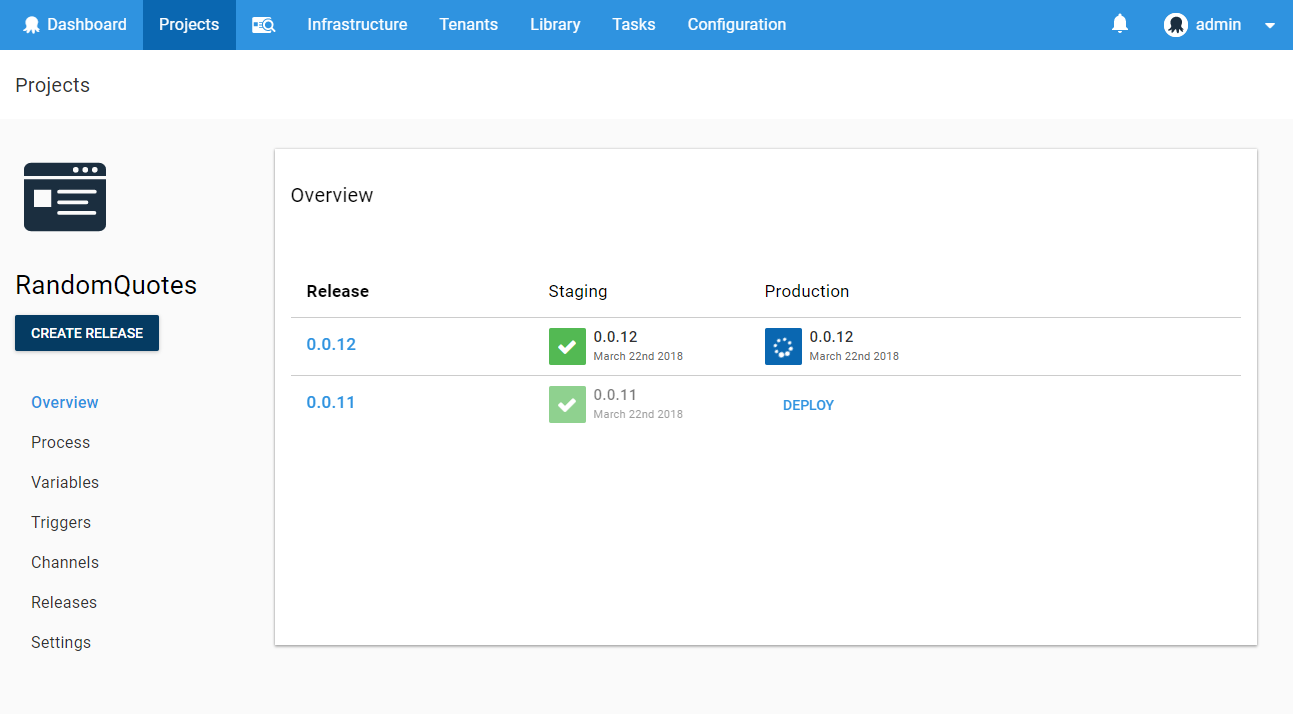
Octopus Projects
After configuring our infrastructure, go to the Projects section, click Add Project, and give it the name RandomQuotes that we specified earlier in our AppVeyor deploy step. This project contains all the deployment steps and configuration variables that define how this application is deployed.
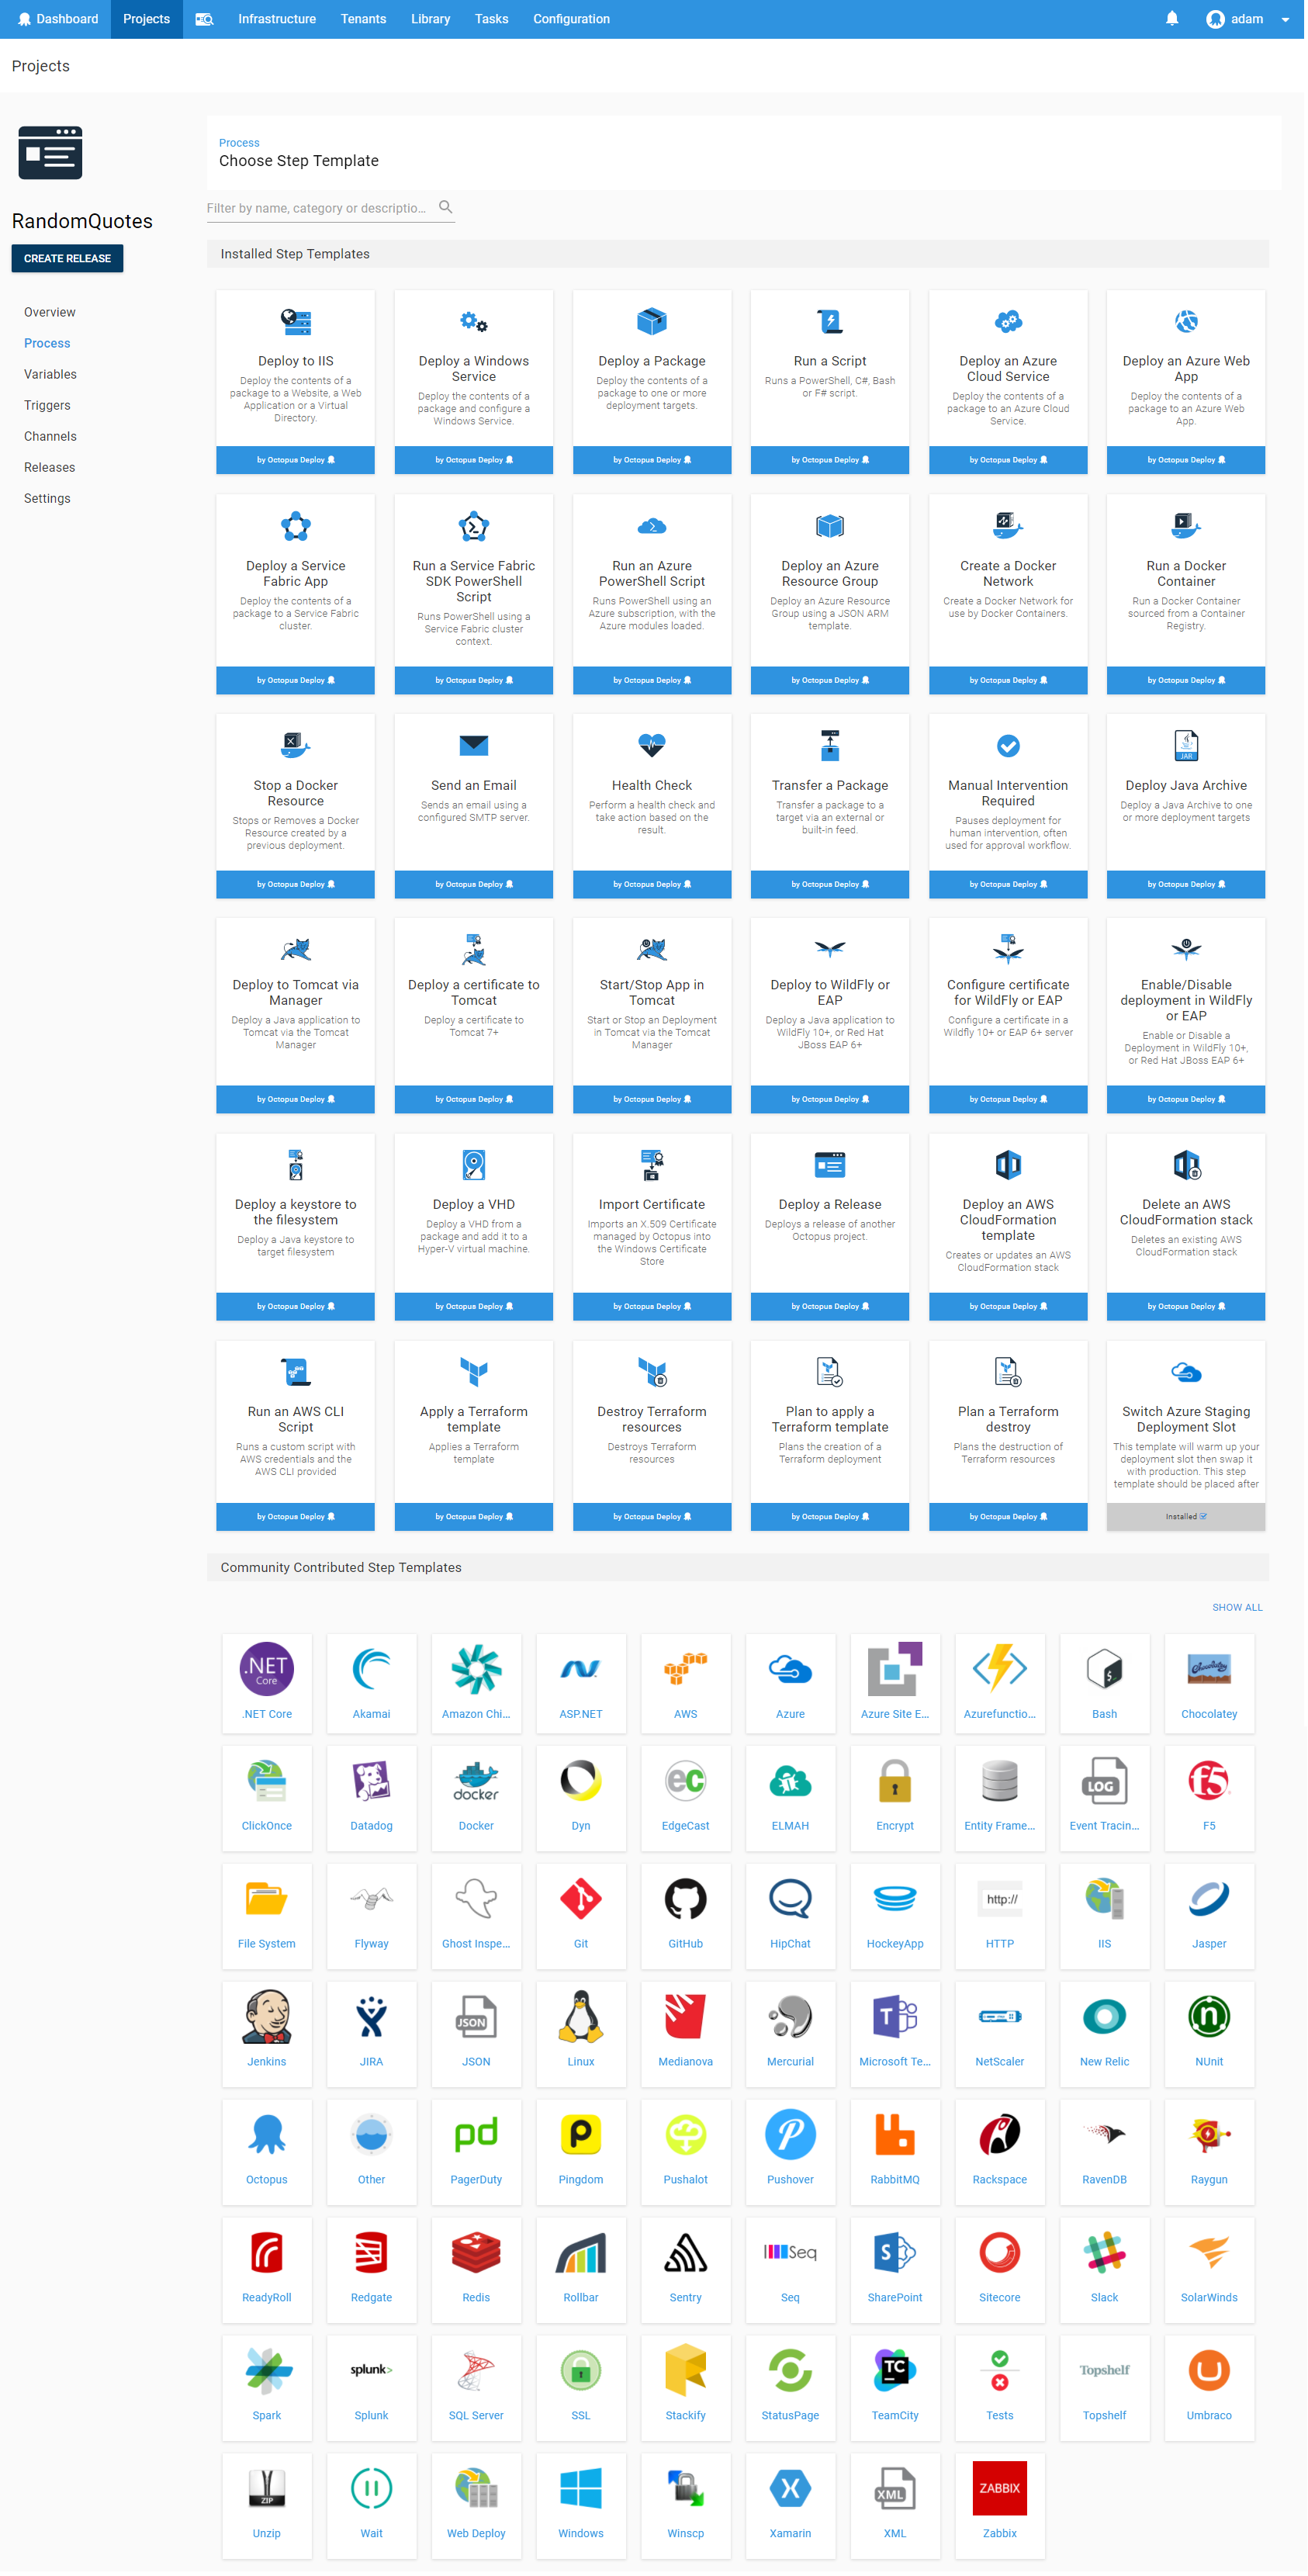
For our simple deployment scenario, we will first go to the Process section and add a new IIS step. Octopus will handle all the complicated interactions to configure our IIS website with just a few inputs from us. There is a wide range of pre-built steps available for use in almost any deployment, so you don't need to write (or support) a single line of code. On top of this, we have an active community library with 100's more, and you can build and share your own steps between teams.
You can also include custom scripts in a variety of languages if you have a process in mind that doesn't quite fit any of the provided steps.
Deployment Step Details
After selecting the Deploy to IIS step, we will add a few settings to provide Octopus information to enable creating and configuring the IIS website.
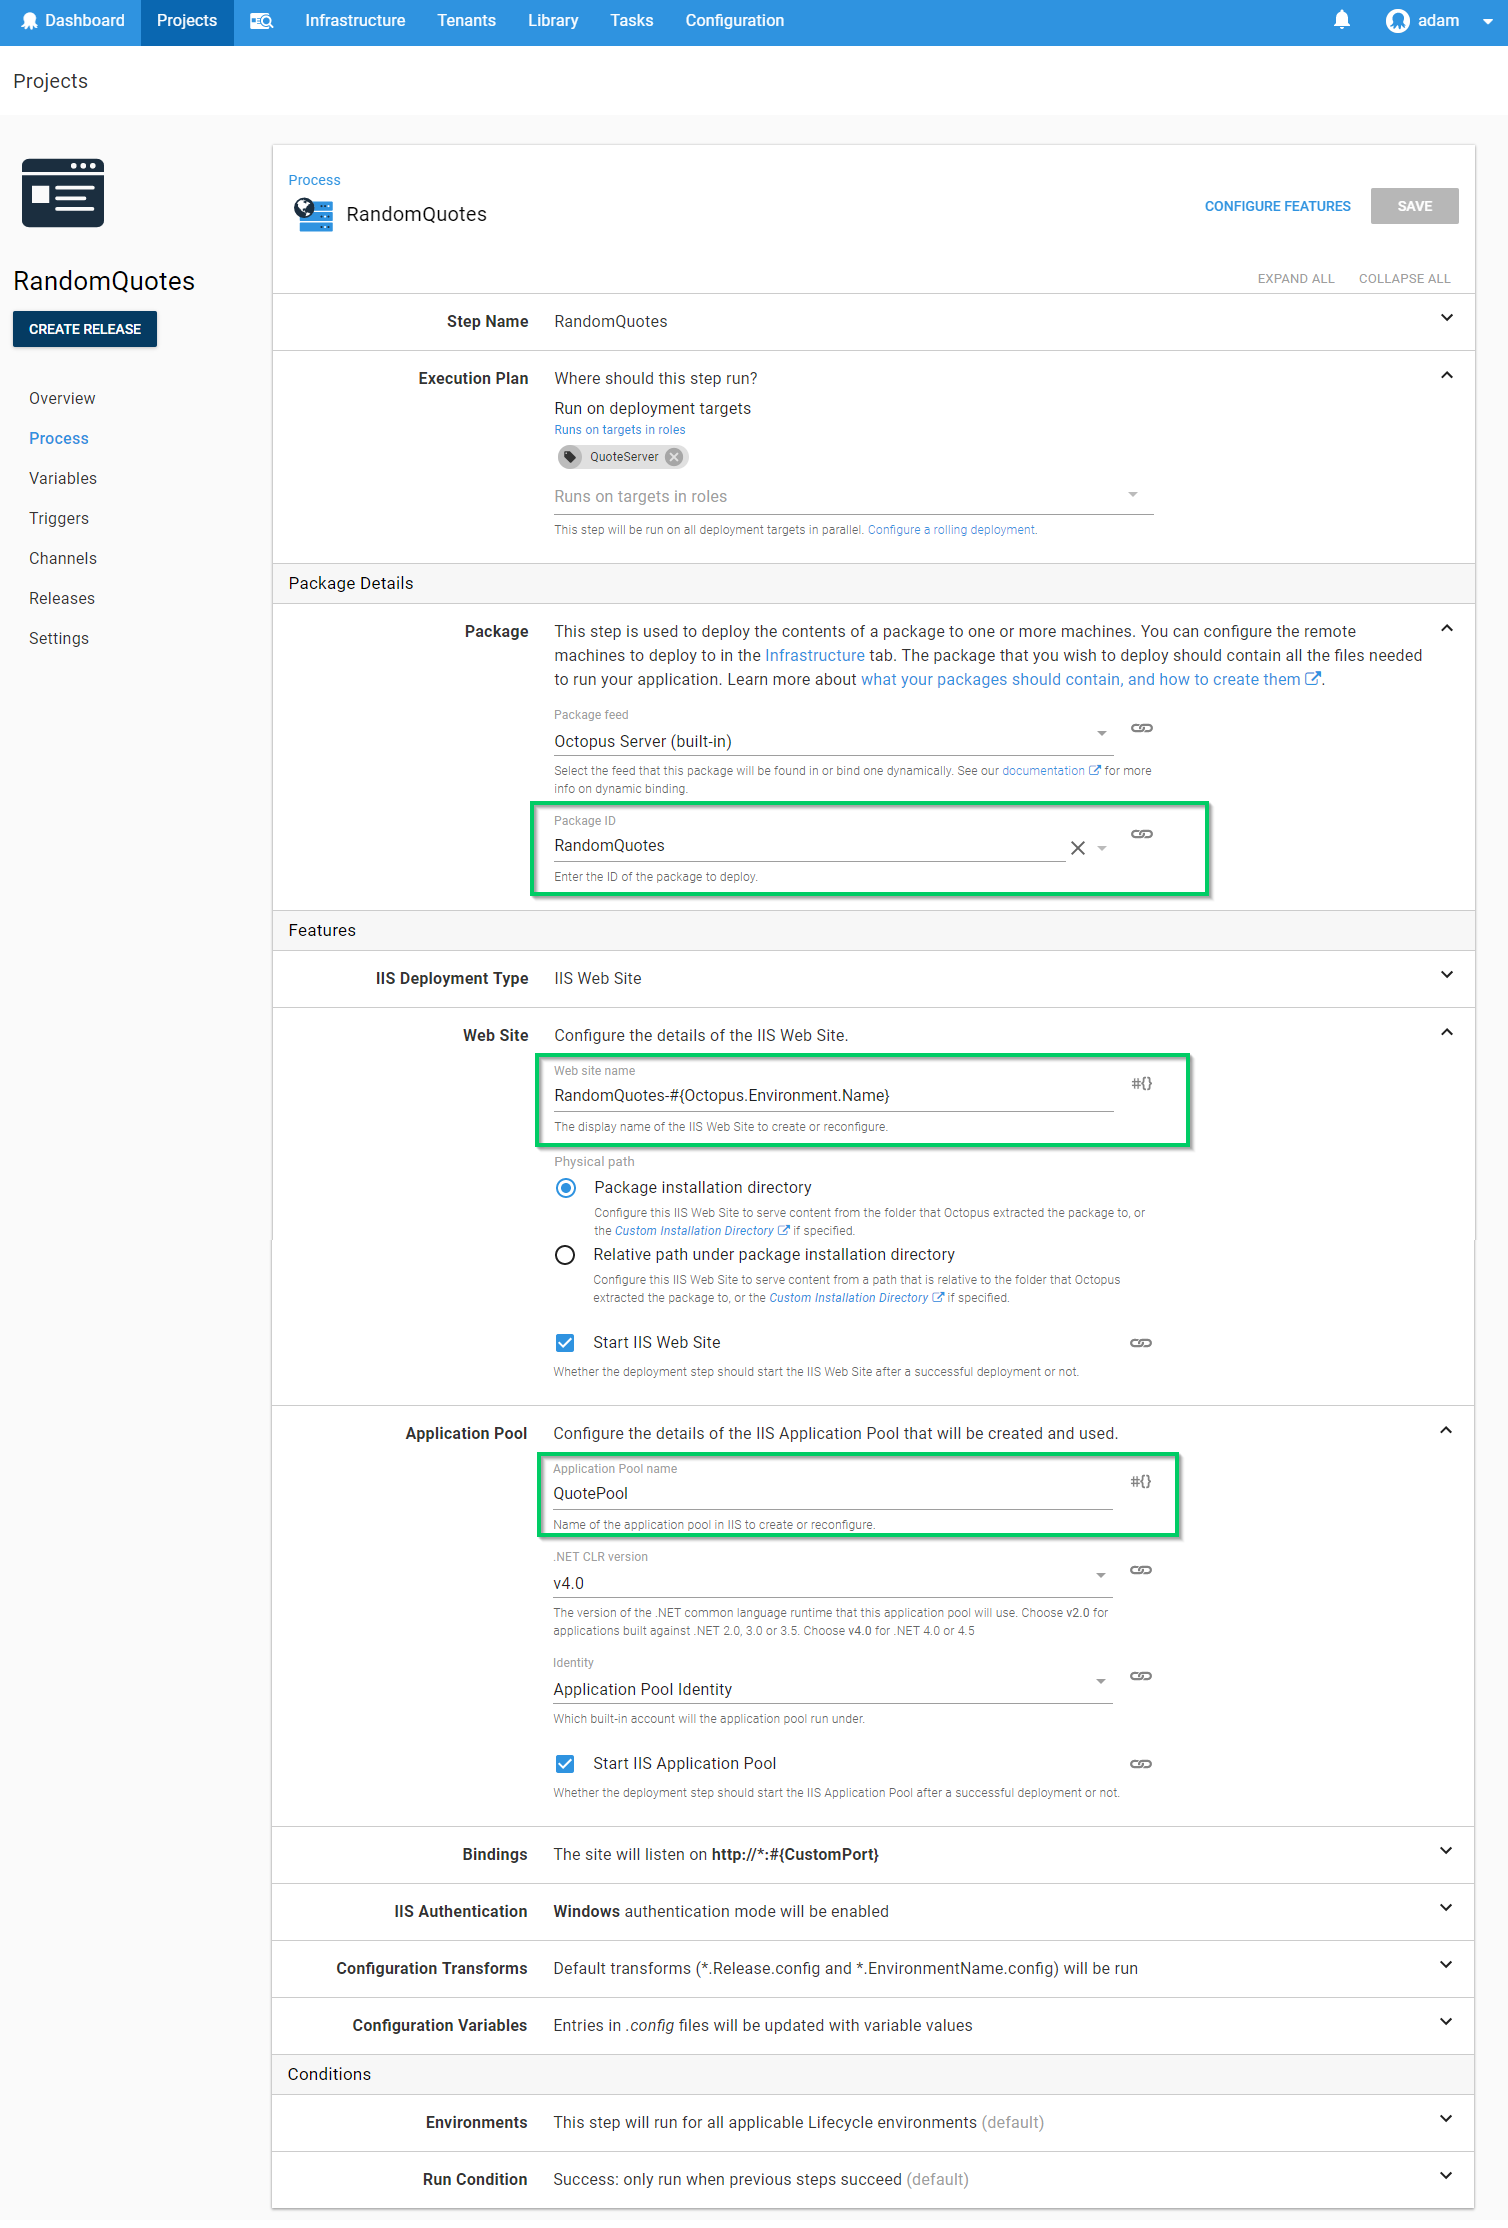
Setting the Role under Execution Plan defines which machine(s) the website will be deployed to. A discussion on how Octopus can handle multiple environments each with different machine roles is a discussion in itself which we skip over in this demo. Check out our docs for more details.
Next, we will configure which package will be used for this step. Using the built-in feed (which AppVeyor will be pushing to) we can provide the PackageId RandomQuotes.
Configuring the website itself, which, at its simplest consists of setting just two additional values. The Website name and the AppPool. For this example, we will host both Staging and Production on the same machine (not the best idea for a real project), so we will provide a different website name based on the environment being deployed. The #{Octopus.Environment.Name} section of the name will be replaced at deploy time with the name of the environment.
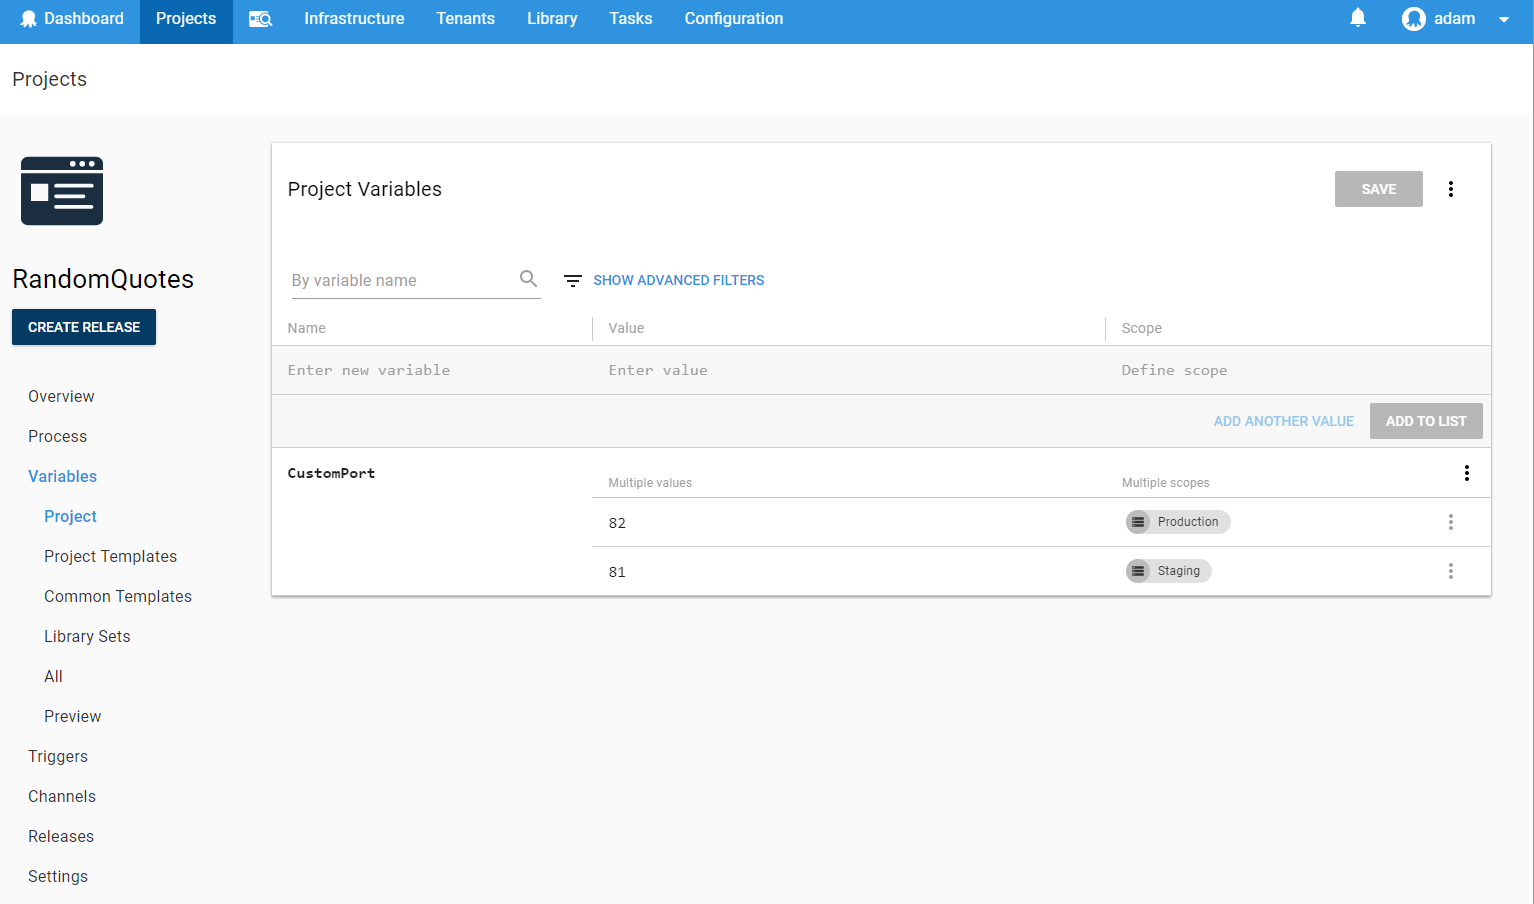
Variables
This introduces us to one of the other awesome features of Octopus Deploy, variables. Using a templating syntax, you can provide configuration values, scripts, or even packages that all make use of variables that can be provided from Octopus itself or even user defined! In addition to the Website Name we have also decided to provide a different binding port between Staging and Production. This value #{CustomPort} is set in the Variables section of the project and can be scoped to a different value based on various combinations of deployment contexts like environment, machine or tenant, to name just a few.
A common pattern is to define variables in Octopus for the different environments which are replaced in configuration files used by the application at run time. Using them during the deployment process opens up a wide range of advanced scenarios.
For our RandomQuotes project, we have a config transformation file for each of our environments. The Web.Production.config transformation that looks like:
<?xml version="1.0"?>
<configuration xmlns:xdt="http://schemas.microsoft.com/XML-Document-Transform">
  <appSettings>
    <add key="ReleaseVersion" value="#{Octopus.Release.Number}" xdt:Transform="SetAttributes" xdt:Locator="Match(key)"/>
    <add key="EnvironmentName" value="#{Octopus.Environment.Name}" xdt:Transform="SetAttributes" xdt:Locator="Match(key)"/>
    <add key="BackgroundColor" value="#1e8822" xdt:Transform="SetAttributes" xdt:Locator="Match(key)"/>
  </appSettings>
  <system.web>
    <compilation xdt:Transform="RemoveAttributes(debug)" />
  </system.web>
</configuration>
Notice the value for ReleaseVersion includes a template pattern During a deployment. (jump to the end of this post if you can't stand the suspense and what to see what this looks like).
Commit and Enjoy
We now have our automated CI/CD pipeline configured. When we commit a change to our project, AppVeyor will automatically pick up the changes, build the project, and push it to our Octopus Server. From this point on, Octopus Deploy takes over and deploys it to our staging environment. Once we are happy with this release, we can deploy to production with the click of a button. The same built package that has been tested will then be pushed to our production environment using new values provided by our variables.
When the deployment occurs, Octopus will apply any web.config transformations in your project and perform variable replacements so that the same built artifact is run in each environment, ensuring that the code that you test is the code that you run in production.
Staging
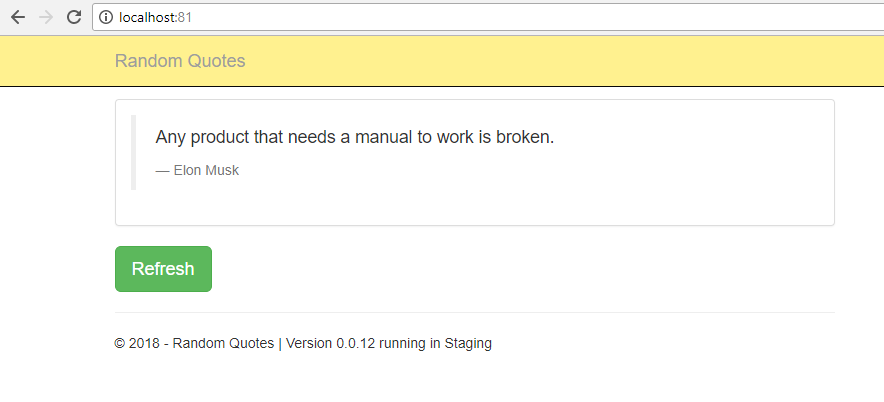
With the staging version of our application available we can inspect and test it before kicking off a deployment to production...
Production
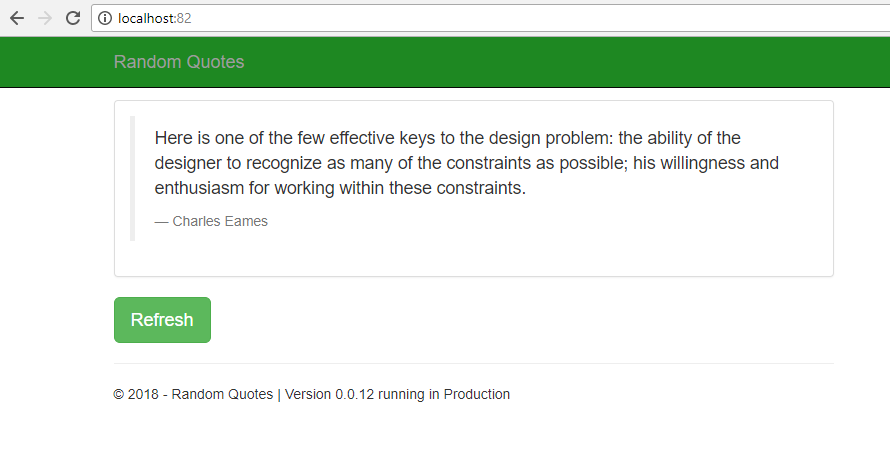
Notice how the transformation has been applied changing the colour of the navbar, while the port and other variables have been updated based on the environment being deployed to.
AppVeyor + Octopus = Deploy Any Time
AppVeyor in combination with Octopus Deploy offers a new and exciting way to automate your continuous delivery pipeline in a repeatable, reliable manner. Say goodbye to hand rolled custom scripting solutions which break down at 5pm on a Friday. Flex the powers of AppVeyor's new feature today with a free Octopus trial.
Happy Deployments!
AppVeyor for Linux
Posted on March 06, 2018
Dear AppVeyor friends,
We’d like to thank you for building and testing your awesome Windows applications on AppVeyor! Your trust and support have always been driving us to evolve the service.
Today, we want to give you twice as much value with the addition of Linux platform! Now you can run your builds side-by-side on Ubuntu and Windows images.
It’s not a weekend project and we have a strong commitment to make AppVeyor a full-featured cross platform solution.
Evolved from our Windows offering, AppVeyor for Linux has some unique features:
- Connect multiple version control systems: GitHub, Bitbucket, GitLab, VSTS, Kiln and any other Git, Mercurial or Subversion repository.
- Configure CI for your projects via UI or in dot-file.
- Full
sudoaccess to VM running build. - Promoted deployments - build once and deploy the same packages to multiple environments.
- Official out-of-the-box .NET Core support - automatic build, test and packaging of .NET Core projects. Proof: build, config, website - dedicated blog post is coming!
- SQL Server 2017 for Linux.
- Bash and PowerShell Core for controlling build flow.
- Single configuration file for both Windows and Linux builds.
- Docker support.
- Built-in NuGet server.
How to get started
AppVeyor for Linux is currently in private beta, available by request. To participate in beta just reply to this message and provide your AppVeyor account details.
We have prepared a Getting started with AppVeyor for Linux guide where you can also find a list of supported features and pre-installed software.
Pricing
Perhaps what is most amazing about the addition of this new Linux platform is that it will not affect our low pricing! Once out of beta, the new Ubuntu image will be available to every account, free or paid. However, Premium accounts with two or more concurrent jobs will benefit the most as they will be able to run their tests on two platforms simultaneously.
Enjoy!
Best regards,
AppVeyor team
Follow us on Twitter: @appveyor
Scheduled builds for free accounts
Posted on November 08, 2017
Builds run on schedule is a feature we’ve been offering since early days of AppVeyor. It works great for many private and OSS projects. However, over the time we started noticing that there are a lot of “abandoned” projects with maintainers once configured scheduled builds and then leaving them running for the same commit over and over again.
Starting today we are making scheduled builds an optional feature for free accounts which is disabled by default. Paid accounts will continue to have scheduled builds enabled by default.
If you are the maintainer of OSS project and your CI workflow requires scheduled builds contact AppVeyor team and briefly describe your needs to request this feature.
Best regards,
AppVeyor team
Follow us on Twitter: @appveyor