Deploying using Web Deploy
Application can be automatically deployed during the build to staging environment and promoted to specific environment later from UI or through API. AppVeyor can deploy web application from Web Deploy package or zip archive.
- Creating Web Deploy package
- Web Deploy deployment settings
- Specifying correct connection details
- Web Deploy Parametrization
- Using Web Deploy with a Node.js website
Creating Web Deploy package
Automatic packaging
During “MSBuild” phase AppVeyor automatically detects Web Application projects in the solution and publish them as Web Deploy packages to build artifacts:
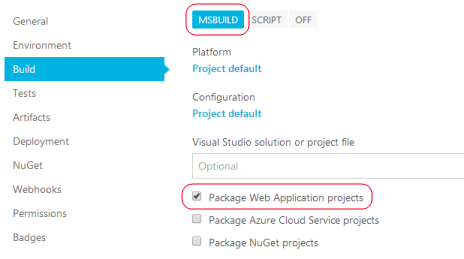
Here you may also set required configuration to choose proper web.config transformation.
AppVeyor uses the following command to create Web Deploy package:
msbuild <web_app.csproj> /t:Package /p:PackageLocation=<web-deploy-package.zip> /p:PackageAsSingleFile=True
By default, Web application project artifact deployment name is the same as project name. However, in some cases it can be useful to customize deployment name. This especially makes sense when multiple Web application projects use the same Agent deployment Environment. For Agent deployment, artifact deployment name is a key setting and it would be convenient to have the same deployment name for all projects using certain Agent deployment Environment. To achieve this, provide custom value for APPVEYOR_WAP_ARTIFACT_NAME environment variable.
Custom packaging
If you build your app using a script or build framework like MSBuild, PSake or rake you can push the package to artifacts using the command:
appveyor PushArtifact <path-to-package.zip> -Type WebDeployPackage
Optionally, use -DeploymentName switch, can be useful with Agent deployment Environment as described in previous section.
Sample commands for packaging web app project as “file system” (for “xcopy” deployment) and pushing to artifacts:
msbuild ProjectFile.csproj /t:WebPublish /p:WebPublishMethod=FileSystem /p:DeleteExistingFiles=True /p:publishUrl=%APPVEYOR_BUILD_FOLDER%\ProjectFile
7z a ProjectFile.zip %APPVEYOR_BUILD_FOLDER%\ProjectFile\*
appveyor PushArtifact ProjectFile.zip
Including extra files into Web Deploy package
Sometimes you need to add additional files into Web Deploy package which are not part of Web Application project, but should be deployed to a web server along with web application. These can be some resources or content files generated by a build tool or Azure Web Job files in App_Data folder.
Read this answer at Stack Overflow for detailed instructions on how to include/exclude extra files into/from Web Deploy package.
Just to give you a sense of the technique described in that article this is how to add Azure Web Job files into App_Data folder of web application package. We assume here that your solution contains two projects: Web Application located in $(SolutionDir)WebApp directory and Azure Web Job project located in $(SolutionDir)WebJob. You should add the following snippet at the very bottom of Web Application .csproj (.vbproj) file:
<PropertyGroup>
  <CopyAllFilesToSingleFolderForPackageDependsOn>
    CustomCollectFiles;
    $(CopyAllFilesToSingleFolderForPackageDependsOn);
  </CopyAllFilesToSingleFolderForPackageDependsOn>

  <CopyAllFilesToSingleFolderForMsdeployDependsOn>
    CustomCollectFiles;
    $(CopyAllFilesToSingleFolderForPackageDependsOn);
  </CopyAllFilesToSingleFolderForMsdeployDependsOn>
</PropertyGroup>
<Target Name="CustomCollectFiles">
  <ItemGroup>
    <_CustomFiles Include="$(SolutionDir)WebJob\bin\$(ConfigurationName)\**\*" />
    <FilesForPackagingFromProject  Include="%(_CustomFiles.Identity)">
      <DestinationRelativePath>App_Data\jobs\continuous\MyJob\%(RecursiveDir)%(Filename)%(Extension)</DestinationRelativePath>
    </FilesForPackagingFromProject>
  </ItemGroup>
</Target>
If files you would like to include into the package are in the same project and you don’t need to change their archive paths then you could use a simpler approach. Just add the following BeforeBuild target to Web Application’s .csproj or .vbproj:
<Target Name="BeforeBuild">
  <ItemGroup>
    <Content Include="some-path\*.*" />
    <Content Include="some-other-path\*.*" />
  </ItemGroup>
</Target>
Excluding files/folders from Web Deploy package
See Excluding Files and Folders from Deployment article on ASP.NET web site. This method works well for packaging Azure Cloud Service too.
Web Deploy deployment settings
Web deploy provider settings are specified on Deployment tab of project settings, appveyor.yml or on environment settings page.
- Server (
server) - server name with remote agent service installed or URL of Web Deploy handler. - Website name (
website) - web site name to deploy to, e.g. Default Web Site or myserver.com - Username (
username) - Password (
password) - NTLM authentication (
ntlm) - NTLM authentication is primarily used by Remote Agent Service. Usually, IIS 7 and up web servers use Web Deploy Handler approach with Basic authentication. - Remove additional files at destination (
remove_files) - when set selected provider performs full content synchronization, i.e. deletes files at destination that don’t exist in the package. - Skip directories (
skip_dirs) - semicolon list of regular expressions specifying the list of directories to skip while synchronizing web site contents, for example\\App_data;\\uploads. - Skip files (
skip_files) - semicolon list of regular expressions specifying the list of files to skip while synchronizing web site contents, for exampleweb.config(all web.configs) or only the root config for MVC apps^((?!Views).)*web\.config$(thanks to this blog post). - Take ASP.NET application offline during deployment (
app_offline) - places app_offline.htm page into the root of web application before sync to take app offline and then remove the page when deployment has finished. - Artifact to deploy (
artifact) - artifact name containing application package to deploy.
Specifying correct connection details
Remote agent service
If you’re deploying to the remote agent service on the destination web server, you can specify the target computer name (for example, TESTWEB1 or TESTWEB1.fabrikam.net), or you can specify the remote agent endpoint (for example, http://TESTWEB1/MSDEPLOYAGENTSERVICE). The deployment works the same way in each case.
Typically, NTLM should be enabled when deploying to remote agent service.
See Configuring Deployment Properties for a Target Environment for more details.
Web Deploy Handler
If you’re deploying to the Web Deploy Handler on the destination web server, you should specify the service endpoint and include the name of the IIS website as a query string parameter (for example, https://STAGEWEB1:8172/MSDeploy.axd?site=DemoSite).
Typically, Web Deployment Handler uses Basic authentication which is enabled by default.
See Configuring Deployment Properties for a Target Environment for more details.
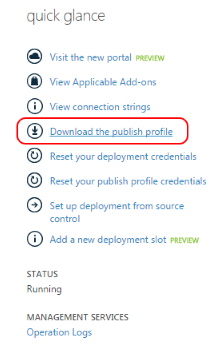
Azure App Service
Open website dashboard in Azure Management Portal and download publish profile:
Specify the following deployment settings in AppVeyor:
- Server:
https://<publishUrl>/msdeploy.axd?site=<msdeploySite> - Website name:
<msdeploySite> - Username:
<userName> - Password:
<userPWD> - NTLM: disabled
Replace <publishUrl>, <msdeploySite>, <userName> and <userPWD> with values from downloaded publishing profile XML file like in example below:

External links:
Configuring in appveyor.yml:
deploy:
  provider: WebDeploy
  server:
  website:
  username:
  password:
  ntlm: true|false
  remove_files: true|false
  artifact:
Web Deploy Parametrization
When deploying web application to different environments you don’t want to re-build application package every time with different configurations, but you want to deploy the same package (artifact) with some environment-specific settings configured during deployment. When using Web Deploy the problem can be easily solved by Web Deploy parametrization.
Usage scenarios
Most common use cases for Web Deploy parametrization is updating node/attribute value in XML files or replacing a token in text files, for example:
- appSettings in
web.config - connection strings in
web.config - WCF endpoints
- Paths to log files
- Database name in SQL install script
Parameters.xml
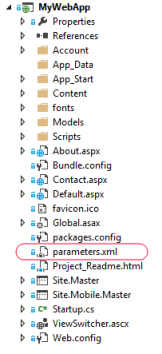
To enable Web Deploy parametrization add parameters.xml file in the root of your web application.
Parameters.xml contains the list of parameters required (or supported) by your Web Deploy package. In the example below we introduce two parameters - one to update path to log file in appSettings section of web.config and another one to set database name in SQL script.
Parameter element describes the name, default value and the places where and how this parameter must be applied.
Parameters.xml for our example:
<?xml version="1.0" encoding="utf-8" ?>
<parameters>
  <parameter name="LogsPath" defaultValue="logs">
    <parameterEntry kind="XmlFile" scope="\\web.config$" match="/configuration/appSettings/add[@key='LogsPath']/@value" />
  </parameter>
  <parameter name="DatabaseName">
    <parameterEntry kind="TextFile" scope="\\Database\\install_db.sql$" match="@@database_name@@" />
  </parameter>
</parameters>
Please note that for SQL connection string, both parameter name and environment variable should be named <connectionname>-Web.config Connection String where <connectionname> is the name of the connection in the Web.config file (often “DefaultConnection”). More details are in this forum post and specifically in this comment.
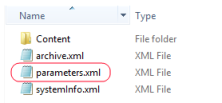
When Web Deploy package is built you can open it in the explorer and see parameters.xml in the root:
The resulting parameters.xml combines your custom parameters and system ones such as IIS Web Application Name. You don’t have to set IIS Web Application Name parameter explicitly - AppVeyor does that for you.
Read more about defining parameters: https://technet.microsoft.com/en-us/library/dd569084(v=ws.10).aspx
Setting parameters during deployment
Web Deploy provider analyzes Web Deploy package and looks into environment variables to set parameter values with matching names.
When promoting specific build from Environment page you set variables on environment settings page:
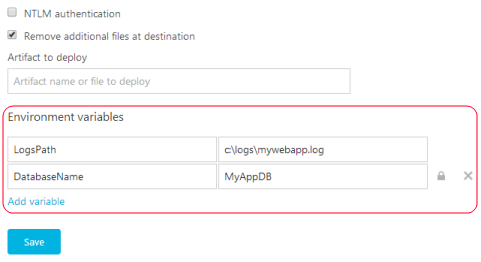
When deploying during the build session environment variables are used instead. You can set build environment variables on Environment tab of project settings, appveyor.yml or programmatically during the build.
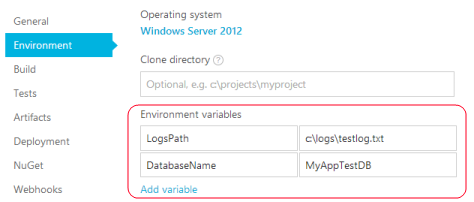
Variables defined during the build override those ones defined on Environment level.
Using Web Deploy with a Node.js website
Web Deploy works great as a deployment tool with a Node.js website. The trick is getting the website assests all packaged into a single zip asset and then using web deploy to sync up this single zip. To do this, we need to do one main step in our node build script (not in the AppVeyor build script, but in your personal node build script) and then two main steps in our AppVeyor build pipeline.
- (Node script) First, you need to throw all your final assests into a temporary folder which contains your node site, all bundled and minified, etc. e.g.
\src\dist. Use whatever tools your comfortable with (i.e. webpack/browserfy/grunt/gulp/etc.) - (AppVeyor configuration) Zip up this folder.
- (AppVeyor configuration) Tell MsDeploy to deploy this zip folder to azure.
e.g. AppVeyor script snippet…
artifacts:
  - path: src\dist\
    name: final-app

deploy:
  - provider: WebDeploy
    server: https://<website_name>.scm.azurewebsites.net:443/msdeploy.axd?site=<website_name>
    website: <website_name>
    username: $<website_name>
    password:
      secure: <super secret password that was encrypted using the AppVeyor UI>
    remove_files: true
    app_offline: true
    artifact: final-app
Lets break this down…
artifacts:
  - path: src\dist\
    name: final-app
This will zip up all the contents in the src\dist folder to a zip file to some secret place and the zip file is ‘tagged’ with the name final-app. Remember how we said to make sure your node-script places all our final node assets into this folder?
And next:
deploy:
  - provider: WebDeploy
    <snip>
    artifact: final-app
Notice how, in the deploy settings we have artifact: final-app? That means: use the artifact that was tagged/named final-app which happens to be some zip file previously made.
And voila! The zip is now uploaded to Azure, auto-unzipped and old files will be removed.